GPU-Accelerated Color Separation in Screen Printing: Why Prepress Speed Is Really a Press Throughput Problem

A screen printing press can only print what prepress has released.
That sounds obvious, but many shops still measure press capacity by carousel speed, flash-cure time, or operator efficiency while treating color separation as an administrative step. In practice, the separation queue often determines how many jobs reach the press during a shift.
If one complex design takes 30–90 minutes to separate, a shop running six to eight jobs per day can spend three to twelve hours waiting on prepress. The press may be available, the screens may be clean, and the production team may be ready, but the job is not.
GPU-accelerated color separation changes that equation. It turns prepress from a serial, CPU-bound bottleneck into a faster production stage that can keep jobs moving toward screen exposure, film output, and the press.
What GPU Acceleration Changes in Screen Printing Color Separation
A CPU is designed to handle a broad range of sequential tasks: file parsing, application logic, job management, and many types of calculations. A GPU is built to perform thousands of similar calculations in parallel.
That difference matters when software is processing a high-resolution design across multiple color channels.
In a traditional CPU-bound workflow, the system may work through color extraction, channel compositing, underbase calculations, halftone generation, and transparency rendering in a largely sequential process. Complex artwork (with gradients, shadows, fine details, and multiple spot colors) can make that queue progressively slower.
A GPU-accelerated workflow can distribute many of those pixel-heavy operations across parallel processing units. In practical screen printing terms, that can improve:
Per-channel color analysis and rendering
Palette optimization across multiple spot colors
Smart underbase calculations
Halftone generation and tonal processing
Transparency and film-output rendering
Live preview updates when settings change
Processing of high-resolution artwork at production size
The CPU still has important responsibilities. It can manage uploads, project data, file handling, queues, and user interaction. The GPU handles the repetitive image computations that traditionally consume the most time.
The result is not simply a faster progress bar. It is a shorter distance between approved artwork and production-ready screens.

Why Prepress Speed Determines Screen Printing Throughput
Consider a shop with one prepress operator and an eight-hour production shift.
If six jobs each require 45 minutes of separation work, the shop spends 4.5 hours on separations alone. At 90 minutes per job, the same queue requires nine hours: longer than the shift before accounting for artwork corrections, screen preparation, exposure, registration, and press setup.
For eight jobs, the range becomes four to twelve hours.
That is why separation speed is a capacity issue. A delayed separation can push back:
Film or transparency output
Screen coating and exposure
Screen registration
Press setup
Customer approval
Rush-job acceptance
Reorder scheduling
InkSplit benchmarks indicate that shops can save approximately one to three hours per job, depending on artwork complexity and the existing manual workflow. At an average potential savings of about $45 per job, six jobs represent roughly $270 in daily prepress savings. Across a five-day week, that is approximately $1,350 before considering the additional rush work or reorders the recovered capacity may support.
Those numbers are not a promise that every shop will print three extra jobs per day. Press speed, screen exposure, curing, labor, and garment handling still limit output. The practical benefit is more flexible capacity: more jobs can reach the press on time, and the shop has room to accept work that previously would have conflicted with the schedule.
A GPU-Accelerated Color Separation Workflow
The value of acceleration is greatest when it is connected to a repeatable workflow. InkSplit combines automated separation, underbase generation, live preview, cloud project storage, and optional RIP output in one browser-based environment.
1. Upload artwork and establish the prepress target
Begin with artwork at final print size and a defined production target. Confirm the garment color, print dimensions, target screen count, preferred ink library, and intended mesh count.
Before processing, check the file for:
Unwanted backgrounds
Excessive borders
Incorrect transparency
Low-resolution elements
Unnecessary color variation
Artwork that has not been scaled to final size
InkSplit’s image controls can help trim and upscale artwork while preserving resolution and halftone integrity. Removing unwanted colors before separation is also more efficient than cleaning every channel afterward.
You can start from the InkSplit color separation workspace.
2. Generate the automated separation and optimize the palette
InkSplit analyzes the design and generates individual channels based on the artwork’s color structure, tonal transitions, shadows, highlights, and overlapping areas.
GPU acceleration is especially valuable here because each channel contains large amounts of image data. The system can process multiple channel operations in parallel rather than forcing the operator to build and revise every plate manually.
Palette optimization also helps prevent unnecessary screens. A design may contain hundreds of sampled colors but require a controlled set of screen printing inks. Mapping channels to a shop’s approved ink library or Pantone references creates a more practical separation and supports repeatable production.
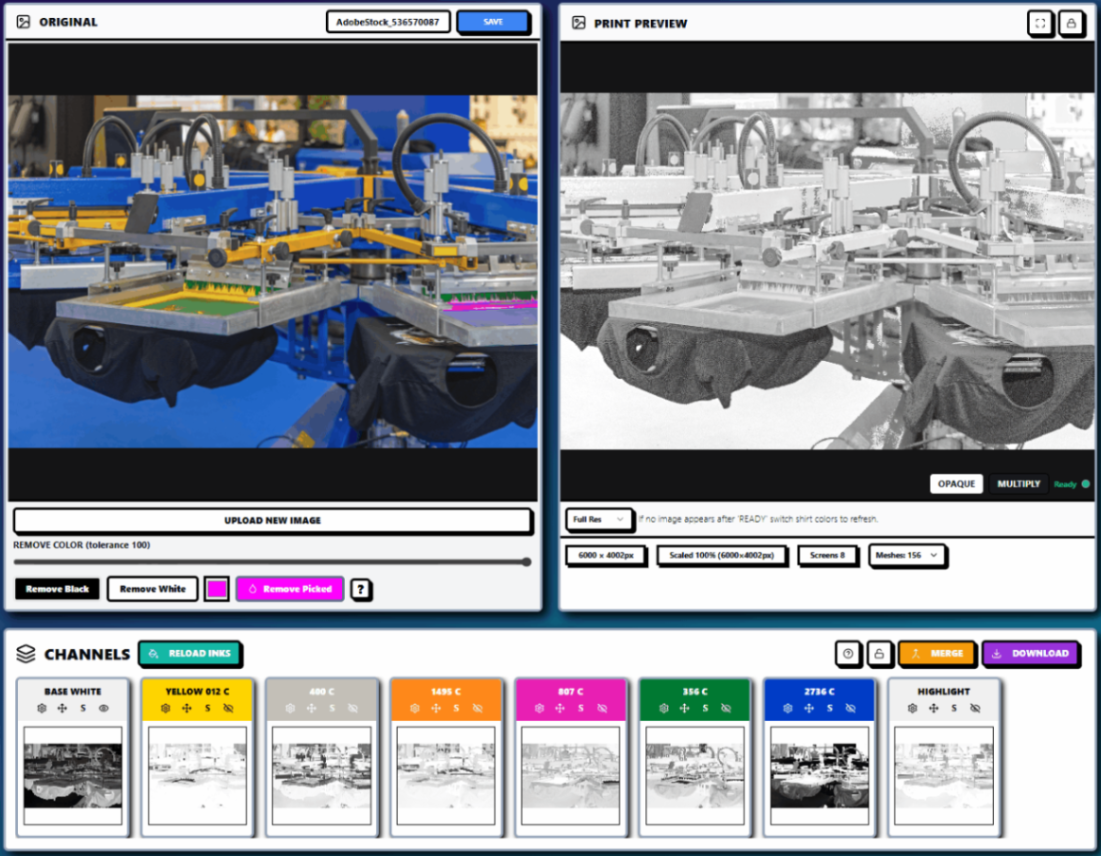
3. Generate the smart underbase
On dark garments, the underbase has a direct effect on color brightness, ink usage, and hand-feel.
A full, heavy white layer may increase opacity, but it can also create unnecessary ink buildup. InkSplit’s smart underbase technology places white ink where it is needed to support the top colors while reducing coverage where it is not contributing meaningfully to the print.
Review the:
Underbase strength
Opacity
Choke or trap
Tonal coverage
Detail beneath small type
Transition through gradients and shadows
A calibrated choke helps limit white halos when registration shifts. The correct value depends on artwork size, mesh count, ink deposit, press accuracy, and garment. Intelligent ink management is not only a quality feature. It can help produce a softer hand-feel than an unnecessarily dense underbase.
4. Review halftones, mesh count, and RIP output
Halftones convert continuous tones into printable dots. Their success depends on the relationship between halftone LPI, mesh count, emulsion, exposure, ink viscosity, squeegee pressure, and dot gain.
As a starting point, a 156 mesh may support a more forgiving 45–55 LPI profile, while a controlled 196–230 mesh setup may support finer halftones. These are production starting points, not universal rules. Validate them with your own screens, ink system, squeegee durometer, and exposure process.
A RIP workflow should preserve the intended:
Halftone LPI
Dot shape
Screen angles
Dot-gain compensation
Channel order
Transparency density
Film dimensions
Output scaling
InkSplit can export separated channels to your preferred RIP software. Shops without an established RIP method can use the built-in RIP to reduce file handoffs and setting mismatches between separation and film output.

5. Use live print preview before exporting films
A channel can look correct by itself and still produce an unbalanced print when combined with the other plates.
Use the live print preview to check the separation on the intended garment color. Review facial features, fine type, highlights, dark shadows, gradient transitions, underbase edges, and areas that may plug up.
The preview is also a useful calibration checkpoint. If colors appear too heavy, highlights disappear, or the underbase dominates the design, make the adjustment before film output or screen exposure.
This is where faster processing becomes operationally important. When preview updates happen quickly, operators are more willing to test a setting, compare results, and correct the job before it reaches the production floor.
6. Save the project and export production files
Once the result is approved, save the complete project, not just the final transparency files.
Cloud-based project storage can preserve the artwork, channel structure, ink library mapping, underbase settings, halftone information, garment color, and preview. When a customer reorders, the shop can reopen the calibrated project rather than reconstructing the separation from a flattened file or an old local workstation.
InkSplit’s features page details project management, live base updates, channel controls, and other tools that support this workflow.

The Throughput Math: Jobs, Rushes, and Reorders
Suppose a shop normally separates six jobs per shift at 60 minutes each. That is six hours of separation work.
If automation saves even one hour per job, the theoretical recovery is six labor hours. That recovered time can be used to:
Release jobs to screen exposure earlier
Accept a same-day rush
Process artwork corrections without delaying production
Prepare another customer’s reorder
Review difficult artwork instead of rushing it
Reduce overtime and re-burns
Cloud-stored projects create another form of capacity. A reorder may require a new garment color, print size, or quantity, but it does not necessarily require rebuilding the original separation. The operator can reopen the saved project, verify the underbase and ink settings, review the live preview, and export the updated channels.
That makes repeat business more profitable and more predictable.
Pitfalls of Racing Through Prepress
Speed only creates value when the output remains calibrated. Avoid these common shortcuts:
Skipping the underbase choke
A missing or unsuitable choke can create white halos around top colors. Review registration tolerance and validate the choke for the design scale and press.
Choosing the wrong halftone LPI for the mesh count
Fine dots on an unsuitable mesh may wash out, close up, or produce unstable gradients. Match LPI to mesh, emulsion, exposure, ink deposit, and the shop’s actual production conditions.
Failing to check transparency and film output
A separation may appear correct on screen while transparency behavior, knockout settings, or film density create problems during exposure. Confirm that the exported channels retain the intended opacity and output dimensions.
Treating the preview as optional
Live preview is not decoration. It is the final opportunity to catch weak highlights, excessive underbase, muddy shadows, or unexpected garment-color interactions before screens are burned.
Faster Prepress Means More Productive Press Time
GPU acceleration is not a comfort feature for operators who dislike waiting. It changes how much work a screen printing shop can release during a shift.
By accelerating per-channel processing, halftone generation, underbase calculations, preview rendering, and film-output preparation, InkSplit helps reduce the gap between artwork approval and press readiness. The cloud-based workflow also removes dependence on local installations and IT tickets, while saved projects make reorders easier to reproduce.
The goal is not to remove professional judgment. It is to reserve that judgment for the decisions that matter: mesh count, halftone LPI, ink selection, underbase behavior, transparency quality, and calibrated production results.
Explore InkSplit’s automated color separation features, review the 10-color separation workflow, or learn how to stop rebuilding separations on every reorder.
Comments