Rush Orders Without Re-Burns: A Screen Printing Prepress Workflow for Same-Day Color Separation

A rush order that arrives at 9 a.m. and must ship at 5 p.m. does not leave room for trial-and-error prepress. The separation must be technically sound before transparencies reach the exposure unit, because one missed channel, weak underbase, or incorrect halftone setting can turn a same-day job into a re-burn, a press delay, or a missed shipping deadline.
The solution is not simply “work faster.” It is to give rush artwork a defined path through intake, triage, color separation, preview, and output. With a standardized workflow, and GPU-accelerated automation where it provides the most leverage, shops can reduce manual separation work from one to three hours per job to a process measured in minutes.
Why Rush Orders Break a Normal Screen Printing Prepress Queue
A normal prepress queue can absorb interruptions. A rush queue cannot. When a priority job moves to the front, it often displaces artwork that is already being reviewed, separated, or prepared for film. Without clear triage, operators lose time switching between files and repeatedly asking for missing production details.
The most common rush-order delays include:
Incomplete garment or print-size information
Artwork with an unexpected background or transparency issue
More channels than the customer expected
Gradients or photographic areas that require halftones
An underbase that has not been defined for the garment color
Unclear spot-color versus simulated-process requirements
Files that depend on a local workstation or unavailable software
Reorders whose original separation cannot be located
Manual color separation is often the largest bottleneck. Building channels, cleaning masks, managing white ink, applying traps, and checking tonal transitions can consume one to three hours before a single screen is exposed. Under pressure, that is also where avoidable errors occur.
Step 1: Triage the Artwork Before Color Separation
The first five to ten minutes should determine how the job will move through prepress. Do not begin separating immediately. First classify the artwork by production risk.
Low-complexity screen printing artwork
Flat logos, simple illustrations, and limited-color graphics are usually good candidates for spot-color separation. Count the intended ink colors, confirm whether the garment is light or dark, and identify whether an underbase is required.
A four-color logo with clean edges may need only four spot channels, plus a base white or highlight white depending on the garment and print strategy.
Medium-complexity artwork
Illustrations with shading, textured fills, or several overlapping colors require closer review. Look for:
Gradients
Transparent overlays
Fine outlines
Small type
Distressed or broken edges
Areas where colors blend rather than meet cleanly
These designs may still work as spot-color separations, but the operator should confirm how tonal information will be represented before output.
High-complexity artwork
Photographic compositions, detailed character art, and designs with extensive gradients should be treated as high-risk rush files. Identify the number of visual color relationships rather than relying only on the number of obvious colors in the original file.
Pay particular attention to:
Continuous-tone areas that require halftones
Fine highlight dots
Transparency and soft fades
Skin tones and subtle shadows
Color interaction over a dark garment
Registration-sensitive outlines
Dense areas that could create excessive ink buildup
The channel count, halftone frequency, garment color, and available mesh should be considered together. A design may look manageable on screen but become difficult to expose or print if the smallest halftone dots exceed the shop’s validated production window.

Step 2: Choose Spot Color or Simulated Process
When time is short, the right separation method is a production decision, not just a visual preference.
Choose spot color when:
The design has a defined, limited palette
Brand colors must remain consistent
Edges are mostly solid and graphic
The job needs predictable screen count and ink usage
The shop has approved inks available in its library
Spot color is often the fastest path for logos, event graphics, team designs, and bold illustrations. It also makes screen planning more straightforward.
Choose simulated process when:
The artwork contains photographic detail
Gradients carry important visual information
Multiple colors blend continuously
The customer expects dimensional shading
Reducing the artwork to a few solid inks would flatten the image
Simulated process can produce a more faithful result, but it requires disciplined control of halftone frequency, dot shape, mesh count, exposure, and dot gain. On a rush job, automation should create the first production-ready separation quickly, while an experienced operator confirms the result against the shop’s validated profiles.
Do not force every complex image into a spot-color workflow simply to reduce the screen count. A faster separation that produces a poor print is not a faster job.
Step 3: Generate the Separation in Minutes
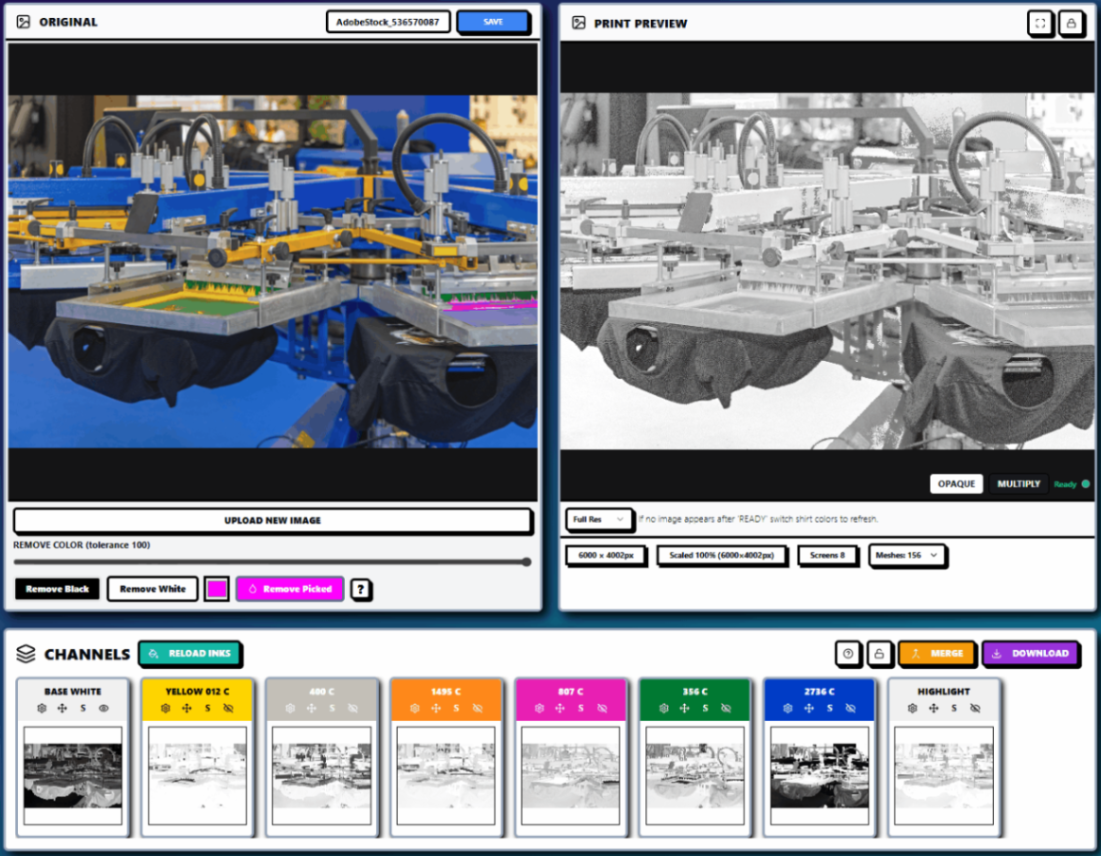
Once the job is classified, use automated color separation to remove repetitive channel-building work. InkSplit’s GPU-accelerated processing analyzes the artwork, generates production channels, and helps prepare complex designs without requiring a local installation or specialized workstation.
The operator can then review the decisions that matter most:
Confirm the final print dimensions and artwork orientation.
Verify the garment color and print location.
Select spot color or simulated-process treatment.
Review the channel count and ink assignments.
Check the underbase and highlight channels.
Confirm the ink-library matches.
Review the live print preview before downloading output.
This approach keeps operator expertise in the workflow without requiring the operator to manually construct every channel from the beginning.
Step 4: Control Underbase, Halftones, and Registration
A rush separation still has to respect the physical print process. The digital preview should be evaluated against the shop’s screens, ink system, and press capabilities.
Underbase and hand-feel
A solid underbase may be appropriate when maximum opacity is required, but it can also increase ink deposit and create a heavier hand. Intelligent underbase management places white ink where it improves coverage and color lift instead of automatically flooding every area.
Review:
Underbase opacity
Choke around color edges
Selective versus solid coverage
Highlight white behavior
Areas where white ink can be reduced
Potential halos caused by registration movement
This is particularly important on dark garments, where the underbase affects both color accuracy and finished hand-feel.
Mesh count and halftone frequency
Use the shop’s validated mesh-to-LPI profiles rather than choosing halftone frequency in isolation. As a practical starting point, many shops use approximately 35–45 LPI for more forgiving apparel work and higher frequencies for fine simulated-process detail, provided the screen, emulsion, exposure, and press setup can hold the dots.
A 156 mesh screen may be appropriate for heavier ink deposit or a forgiving halftone, while 230–305 mesh screens can support finer detail with lower ink deposit. The correct choice also depends on thread diameter, tension, emulsion thickness, ink viscosity, and squeegee durometer.
If a rush design contains delicate highlights, inspect those dots before film output. A highlight that exists in the digital file but cannot survive exposure or washout is not useful production detail.
Registration tolerances
Look for narrow knockouts, small type, thin outlines, and color boundaries that depend on precise registration. Where appropriate, use trapping or controlled spreads to prevent garment-colored gaps. The goal is not to hide every registration variation with excessive overlap; it is to create a practical tolerance for the press and substrate.
Step 5: Use Live Print Preview as the No-Re-Burn Gate
Before sending files to your RIP software or output device, review the complete simulated print, not only the individual channels.
A useful pre-film checklist includes:
Final artwork size and orientation
Garment-color interaction
Complete channel count
Underbase coverage and choke
Highlight and shadow detail
Halftone transitions
Transparent or faded regions
Small text and fine outlines
Ink-library color assignments
Registration-sensitive areas
Preview-to-download consistency
A live print preview is valuable because it shows how the channels work together. An isolated plate may appear correct while the composite print reveals excessive darkness, weak contrast, a missing underbase area, or a color relationship that will not reproduce as expected.
Step 6: Reuse Cloud-Saved Projects for Reorders
Reorders should not enter the queue as new separations. If a customer has approved and printed the design before, reopen the saved project and change only what is different.
A useful project archive should preserve:
Original artwork
Final print dimensions
Garment color and substrate
Channel list and print order
Ink-library selections
Underbase opacity, softness, and choke
Halftone frequency and dot settings
Mesh-count recommendations
Output notes and approval history
The approved live print preview
Cloud-based storage makes these projects available without depending on one local computer, one operator, or a fragile folder structure. It also supports more calibrated results when the garment changes or a customer requests a new print location.
For a rush reorder, the workflow becomes:
Open the approved project.
Confirm what changed.
Adjust garment, size, color, or placement as needed.
Review the new preview.
Export the approved output.
That is significantly safer than rebuilding every channel from memory.

A 9 AM to 5 PM Rush Workflow
A practical same-day schedule might look like this:
9:00–9:10: Confirm artwork, garment, print size, quantity, deadline, and separation method.
9:10–9:20: Triage channel count, gradients, transparency, halftone needs, and underbase requirements.
9:20–9:30: Generate the automated separation and review the channel structure.
9:30–9:45: Adjust ink selections, underbase behavior, trapping, and production settings.
9:45–10:00: Review the live print preview and isolated channels.
10:00 onward: Output transparencies, expose screens, and proceed with press setup while preserving the project for future reorders.
Actual timing depends on artwork complexity, approvals, exposure capacity, and press availability. The important point is that separation should no longer consume the entire morning.
Calculate the ROI of Faster Prepress
InkSplit benchmarks indicate savings of approximately one to three hours per job and about $45 per job, depending on artwork complexity and the shop’s existing workflow.
The value is not limited to labor. Faster, more consistent separations can also reduce:
Re-burns
Misprints
Emergency artwork revisions
Excessive ink usage
Press downtime
Delayed shipping
Repeated reorder preparation
InkSplit plans are structured around separation usage:
Starter: Free, with 30 credits
Creative: $19 per month
Studio: $49 per month
Print Pro: $99 per month, unlimited
Projects use 3 credits per channel, with a 10-credit flat charge for projects containing four or more channels. Each project has a 10-credit unlock cap; after that cap is reached, downloads are free. Review the current InkSplit pricing plans before selecting a plan for your shop’s monthly volume.
Build a Prepress Workflow That Holds Under Pressure
Rush production becomes manageable when the shop separates urgency from improvisation. Triage the artwork, choose the right separation method, automate repetitive channel work, validate underbase and halftones, review the live print preview, and archive the approved project.
For more workflow guidance, see InkSplit’s screen printing prepress queue guide, the guide to mesh count and halftones, and the workflow for cloud-saved reorder projects.
With GPU-accelerated color separation and a live preview that exposes problems before film output, InkSplit helps compress a traditionally manual prepress bottleneck into a controlled process measured in minutes, not hours.
Comments