Screen Printing Transfers vs. Direct Printing: Color Separation and Prepress Strategy for Plastisol and DTF Transfers

The choice between printing directly onto a garment and printing a transfer is not just a press decision. It changes how artwork is separated, how an underbase is built, and how dot gain and registration behave. The right process depends on the order, the garment, the desired hand feel, and whether the transfer needs to be stored for later.
The screen printing decision: direct print or transfer?
Direct screen printing deposits ink through a mesh screen onto a garment. A transfer is printed onto a carrier, such as release paper or DTF film, then applied to the garment with heat and pressure. A mesh count is the number of threads per inch in a screen; it affects ink deposit and the detail a screen can hold. A durometer rating describes squeegee hardness, which also influences deposit and print control.
Dimension | Direct screen printing | Plastisol hot-split transfer | DTF transfer |
Best run length | Medium to large runs, especially repeatable jobs | Small to large runs, especially when transfers can be inventoried | One-offs, samples, short runs, and varied designs |
Colors | Spot colors, specialty inks, and simulated process | Spot-color separations; specialty effects depend on the transfer system | Full-color artwork output on film |
Hand feel | Can be soft, depending on ink, deposit, and garment | Often soft and breathable because the ink film splits during application | Often more noticeable as a film, depending on coverage and film system |
Setup | Screens, registration, garment loading, and press setup | Screens and carrier setup, then a separate heat-press step | Printer/RIP setup, film, white ink, powder adhesive, curing, and pressing |
Best-fit artwork | Repeatable art, thick deposits, specialty inks, and high-volume jobs | Complex multi-color art, small quantities, and designs to stock for reorders | Full-color one-offs, samples, and artwork for garments that are hard to hold flat |
Direct printing often wins at volume: once screens are registered, the cost per piece can be low, and specialty inks or a heavier deposit may be easier to achieve. Transfers are useful for low minimums, samples, mixed garment styles, and blanks a press cannot hold flat. They can also be printed ahead of an order and applied as needed.
The choice is not absolute. Compare the finished garment, not only the carrier or screen. Validate adhesion, stretch, wash durability, color, and hand feel with the materials and press settings you will use in production.
Why transfer prepress changes the screen printing workflow
A transfer is a prepress challenge before it is a heat-press challenge. The artwork must first print reliably on paper or film, then release from that carrier and bond to fabric. An underbase is a white ink layer that supports brighter colors on dark garments. A choke pulls that layer inward slightly so it does not show beyond the color edges.
With a direct print, a printer tunes registration and ink deposit against the fabric, mesh, squeegee, and press. A transfer adds an intermediate surface. The carrier can move or shrink between print passes, and the transfer ink film behaves differently when it releases. Those changes affect registration, dot gain (the apparent spreading of halftone dots), and whether fine details hold through transfer and pressing.

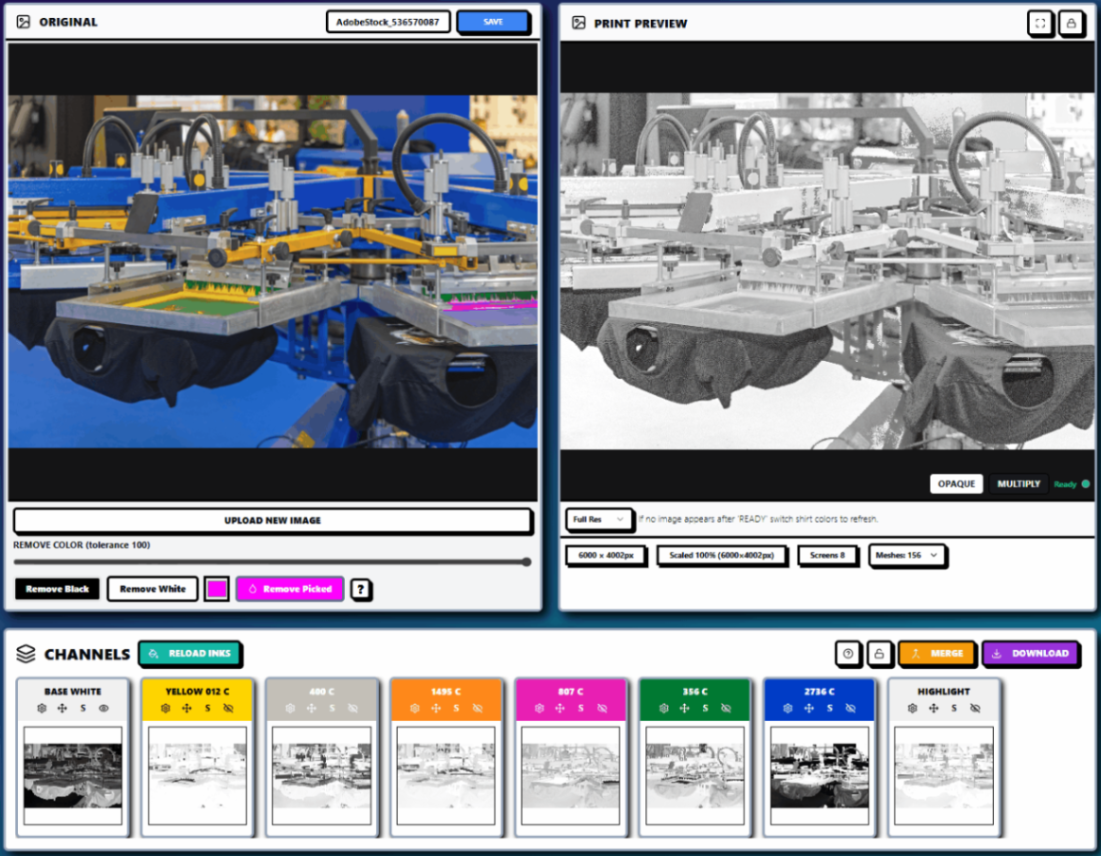
Before and after in InkSplit: the original artwork and processed print preview are shown side by side. Preview the art, then verify mirrored orientation and separation order for the transfer system before output.
A halftone represents continuous tones as dots. Its frequency is measured in LPI, or lines per inch. A transfer recipe may need a more conservative, lower LPI than a comparable direct-print job because the dots must survive printing, release, and application. There is no universal setting: mesh, ink, carrier, and press conditions all matter. A transparency is the film output used to expose a screen; check that its density and fine dots suit the mesh and exposure process.
Plastisol transfers: color separation and halftones
Plastisol hot-split transfers are screen printed onto release paper or film, then pressed onto a garment. The term “hot split” describes peeling the carrier while it is hot: the ink film splits, leaving most of the print on the garment and some on the carrier. This can produce a softer, more breathable result than a transfer that releases the entire ink film. The ink, carrier, gel, temperature, pressure, and peel timing all influence the outcome.
Color separations are usually built as spot-color channels. The artwork is printed in reverse, and the channel sequence must account for the transfer construction: the last layer printed onto the carrier may become the layer closest to the garment. Follow the ink and paper supplier’s specifications and test registration before production. As International Coatings explains, paper shrinkage can create gaps or overlaps, while stable transfer film may help with multi-color registration.
Underbase choke also deserves its own test. A direct-print underbase setting may not translate because the transfer stack, carrier movement, and final ink-film behavior differ. Use enough choke to prevent a white fringe, but not so much that it exposes garment color at the edges. Some systems need a powder adhesive or printable adhesive layer, while others do not. Matte or gloss release surfaces can change the final finish. Confirm the appropriate carrier and adhesive with the supplier rather than assuming one setup fits all.
For halftones, start conservatively compared with a proven direct-print recipe and evaluate a step wedge on the actual carrier. Check lost highlights, filled shadows, and dot gain after pressing. Then refine LPI and screen angles to suit your mesh, ink, and transfer process.
DTF print preparation and film output
DTF means direct-to-film: a printer lays down color and white ink on specialty film, then powder adhesive is applied to the wet print and cured before heat application. Typically, the film output is mirrored. The white ink provides opacity, while the adhesive helps the design bond to fabric. Follow the printer, film, ink, and powder suppliers’ settings for white laydown, powder coverage, curing, and peel.
DTF has no screen mesh, so mesh count does not determine film detail. Instead, pay attention to final-size resolution, clean transparency, white-channel coverage, and how small details hold up after powdering and pressing. Film handling and storage matter too: keep prepared film clean and follow the supplier’s storage guidance for reorders. Epson’s DTFilm overview describes the basic sequence of printing, applying powder, curing, and pressing.
A color separation checklist for transfer jobs
Before output, review these points for the process you selected:
Channel count and order: Confirm the number of inks or output channels and rank them for the correct print sequence.
Underbase choke or bleed: Inspect edges at final size. Check white placement and any necessary color trapping against the actual registration tolerance.
Total ink coverage: Review stacked ink areas and gradients. Follow the ink, film, and printer limits; excessive coverage can change deposit, curing, and hand feel.
Halftone frequency and angles: Choose LPI and screen angles for the process, mesh, and carrier. Test a step wedge rather than relying on an assumed setting.
Output resolution: Confirm the artwork’s pixel dimensions at its final physical size, then check small text and isolated details.
Film density and transparency: For screen output, verify opaque, clean transparencies and registration marks. For DTF, confirm transparent areas and the printer/RIP’s white-channel behavior.
For more on screen output settings, see InkSplit’s guide to transparency output for screen printing.
How InkSplit supports screen print color management
InkSplit automates color separation and provides controls to review channels, gradients, and smart underbase placement. Its ink library supports spot-color matching, while the live print preview helps evaluate artwork against a garment color before output. Saved projects in cloud storage make it easier to return to an approved job for a reorder months later.
Because InkSplit runs in a browser, teams can work without installing separation software on each workstation. GPU acceleration helps process complex artwork quickly. If a shop does not already use preferred RIP software, InkSplit includes a built-in RIP for settings such as LPI, output DPI, dot shape, screen angles, and registration marks. The built-in RIP is an option within the separation workflow, not a requirement for shops using another RIP.
Explore the InkSplit features or the InkSplit User Guide for details on separation, underbase controls, and output.
Compare transfer costs with separation time
A transfer can reduce production friction for specific orders, but prepress time still affects job cost. InkSplit reports that automated separation can save 1–3 hours per job and roughly $45 per job compared with manual separation. Your actual savings depend on artwork complexity, labor rates, and how much revision a job needs.
The pricing structure is designed around output: standard channel exports cost 3 credits per channel, with a 10-credit cap per project. A flat DTF export costs 6 credits, and the Print Pro plan offers unlimited downloads. Compare those costs with the labor and delays associated with manual separations, misprints, and re-burns. For shops handling frequent samples, reorders, and short runs, a repeatable, saved prepress workflow can make the process choice more profitable as well as more predictable.
Comments