The Ultimate Guide to Automated Color Separation: Everything You Need to Succeed

In the world of professional screen printing, the "black box" has always been prepress. For decades, the ability to take a complex, multi-colored piece of artwork: be it a photograph or a detailed digital painting: and break it down into printable screens was a dark art. You needed years of Photoshop experience, a deep understanding of halftones, and a prayer that your underbase wouldn't shift on press.
But the industry has changed. The demand for faster turnarounds, complex "simulated process" designs, and newer technologies like DTF (Direct-to-Film) has made the old manual methods obsolete. If you are still spending two hours tweaking channels in Photoshop, you aren't just wasting time: you’re losing money.
This guide explores the world of automated color separation, showing you how to reclaim your schedule, boost your print quality, and leverage modern tools like InkSplit to stay competitive.
The Evolution of Prepress in Screen Printing
Historically, color separation was a manual, painstaking process. A designer would manually select colors, create "spot channels" in Photoshop, and use various blending modes to simulate gradients. It was slow, prone to human error, and required a high level of technical expertise to avoid "muddy" prints.
Today, automated color separation leverages AI and GPU acceleration to do the heavy lifting. Instead of clicking through color ranges, the software analyzes the entire image globally. It identifies the optimal ink palette, generates the necessary transparency for blending, and builds a perfect underbase: all in seconds.
Why Manual Separation is a Profit Killer
When you look at the true cost of manual color separations, the numbers are staggering. If your prepress manager earns $30/hour and spends 90 minutes separating a single complex job, that’s $45 in labor before a single screen is even burned. Multiply that by five jobs a day, and you’re looking at over $50,000 a year in "hidden" prepress costs. Automation reduces that 90-minute task to under five minutes, effectively turning a cost center into a profit center.
Understanding Automated Color Separation Technology
At its core, automated software like InkSplit doesn't just "split" colors; it optimizes them for the physical reality of a screen printing press. This involves two main strategies:
Simulated Process: Used for photographic or highly detailed artwork. The software breaks the image into a set of spot colors (usually 6–10) that, when printed with halftones, recreate the full spectrum of the original art.
Spot Color Separation: Used for vector-style art where distinct, solid colors are required. The automation ensures that trapping and "chokes" are applied so there are no unsightly gaps between colors on the shirt.
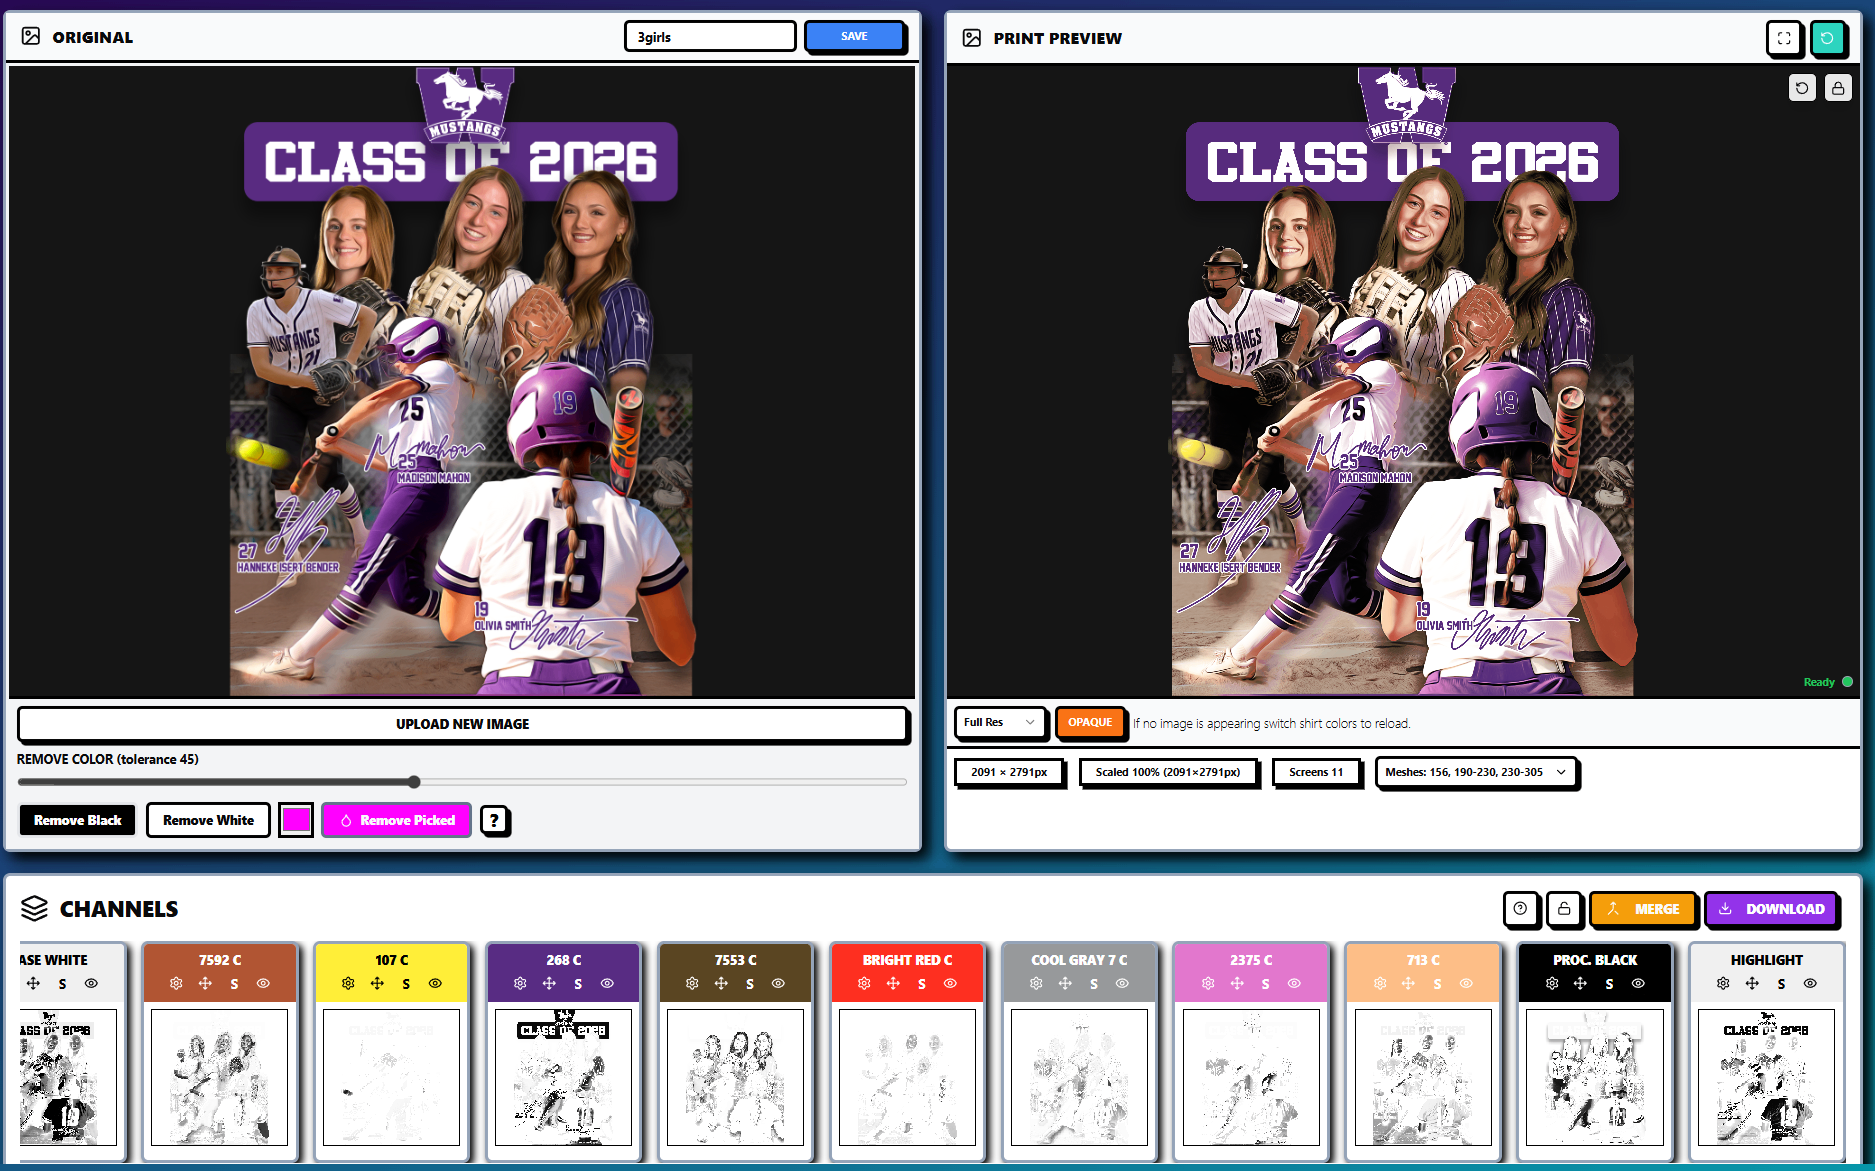
The Power of GPU Acceleration
One of the biggest hurdles in prepress has always been processing power. Standard Photoshop plugins rely on your computer's CPU, which can lag when handling high-resolution files. InkSplit utilizes GPU acceleration, meaning it uses the power of your graphics card to process pixels. This is why separations that used to take minutes of "loading" bars now happen at the speed of light.
Master the Halftones: The Role of Built-in RIP Software
A separation is only as good as the dots it produces. Traditionally, after separating your art, you would have to export the files and run them through a separate RIP software (Raster Image Processor) to convert the gradients into printable halftones.
The modern workflow simplifies this. InkSplit includes a built-in RIP, allowing you to control frequency (LPI), angle, and dot shape directly within the separation interface.
Mesh Count and Durometer: The Physical Side of Digital Separations
Automation doesn't mean you can ignore the physics of your shop. When the software generates a 55 LPI (lines per inch) halftone, you need to ensure your mesh count is high enough to support it. A general rule of thumb is the "rule of five": your mesh count should be 5x your LPI. So, for a 55 LPI print, you should be using at least a 275 or 305 mesh.
Similarly, your durometer choice (squeegee hardness) will affect how those automated separations translate to the garment. A 70/90/70 triple durometer squeegee is often preferred for automated separations because it provides a stiff core to maintain the integrity of the halftone dots while the softer edges ensure good ink shear.

Beyond Screens: DTF Prep and Automated Workflows
While screen printing remains the backbone of many shops, DTF (Direct-to-Film) has exploded in popularity. However, preparing files for DTF presents its own set of challenges, particularly regarding the "white base" and transparency.
Many printers struggle with DTF prints feeling "heavy" or "rubbery." This is often caused by an unoptimized white layer. Automated color separation tools now include dedicated DTF prep modes. These tools can:
Automatically remove the background from images.
Generate a "choked" white underbase to prevent white ink from peeking out (bleeding) past the CMYK layer.
Optimize ink density to ensure the powder adhesive has enough to "grab" onto without oversaturating the film.
By using automation for DTF prep, you ensure that every film you print is optimized for both color accuracy and durability, reducing the risk of delamination or poor hand-feel.
The ROI of Automation: Saving Time and Reducing Misprints
The return on investment for automated separation software isn't just about speed; it's about consistency. When a human separates a job, they might make different choices on Tuesday than they did on Monday. AI-powered algorithms provide a standardized output.
Smart Underbasing
One of the most common causes of misprints is a poor underbase. If the base is too thick, the top colors won't lay down correctly. If it’s too thin, the colors will look dull on dark garments. InkSplit's smart underbase technology analyzes the luminosity of the design to place white ink exactly where it's needed and nowhere it isn't. This leads to softer prints and significant savings on white ink: often the most expensive ink in the shop.

Getting Started with InkSplit: A Step-by-Step Guide
Ready to modernize your prepress? The transition to automated color separation is simpler than most printers realize.
Upload Your Art: Whether it's a 300 DPI raster file or a vector PDF, simply drop it into the web-based interface.
Select Your Strategy: Choose between simulated process, spot color, or DTF prep.
Adjust the Channels: While the software is automated, you still have the "pilot's seat." You can merge colors, adjust the "pull" of the underbase, or swap Pantone values to match your physical ink library.
Live Print Preview: Check your work against different garment colors instantly. No more "guessing" how a design will look on a navy hoodie versus a red tee.
Export and Print: Download your separations as high-resolution files with registration marks included, or send them directly to your film output device using the built-in RIP settings.
Conclusion: Future-Proofing Your Print Shop
The gap between "hobbyist" shops and "pro" operations is narrowing, but the one area where the pros still dominate is workflow efficiency. By adopting automated color separation, you are removing the single biggest bottleneck in your production chain.
Whether you are looking to tackle complex photorealistic prints or just want to stop pulling your hair out over Photoshop plugins, automation is the answer. It’s time to stop working harder in prepress and start printing smarter.
Experience the future of prepress today. Try InkSplit and see how much time: and money( you can save on your very next job.)
Comments